Kling AI Tutorial: How to create AI videos from photos?
In today’s digital landscape, engaging video content is essential for capturing attention. Kling AI revolutionizes the way we create videos by turning static images into dynamic, lifelike animations. Whether you're a professional designer or just looking to bring your photos to life, this guide will walk you through the process of using Kling AI to create stunning videos with ease. Let us dive into Kling AI tutorial to AI Videos from photos using the image-to-video animation feature.
How to create AI videos from photo?
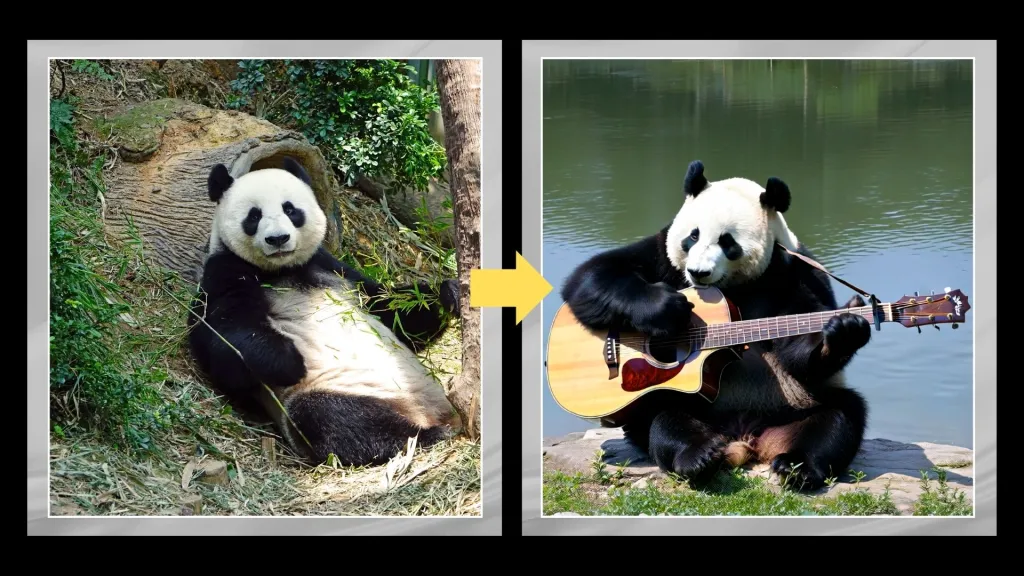
Creating videos from photos has never been easier, thanks to Kling AI’s advanced image-to-video animation capabilities. Whether you're looking to animate a single image or create a dynamic video sequence, Kling AI provides the tools you need. Follow this step-by-step tutorial to transform your photos into stunning videos.
View this post on Instagram
Step 1: Sign Up and Log In
Before you can start using Kling AI, you’ll need to sign up for an account. Follow these steps:
Open your web browser and navigate to the Kling AI website
Click on the "Sign Up" button and enter your email and a password.
Confirm your account via the verification email sent to you.
Log in using your credentials.
Step 2: Upload Your Photo
Once you’re logged in, you’ll be directed to the Kling AI dashboard. Here’s how to upload your photo:
Click on the "Create New Project" button.
Click "Image to Video" from the available options.
Click the "Upload Image" button to choose the photo you want to animate from your computer.
Your image will appear in the preview window.
Step 3: Choose Your Video Style
Kling AI offers different video styles, allowing you to choose the animation that best fits your vision:
Standard Mode: This mode is suitable for simple animations with minimal motion. It’s great for creating videos with smooth, natural movements.
Professional Mode: Choose this mode if you want higher visual quality. This mode is ideal for more static scenes or when you want to highlight fine details in your photo.
Select the mode that best suits your project. If you’re unsure, you can experiment with both modes to see which one delivers the best results.
Also read: How to use lightings in Midjourney: Working with multiple lightings on a single image
Step 4: Create Your Animation Prompt
The core of Kling AI’s animation process lies in the prompt you create. Your prompt should describe the actions you want to see in the video:
Describe the Actions: Instead of just describing the scene, focus on what you want to happen. For example, if your photo is of a person sitting on a bench, you might use a prompt like, “A bird flies in and lands on the person’s shoulder.”
Be Specific: The more detailed your prompt, the better the animation. Specify movements like turning heads, raising arms, or even smiling.
Test and Adjust: If the first prompt doesn’t yield the desired result, don’t hesitate to tweak it. Small adjustments can make a big difference.
Step 5: Adjust the Creativity and Relevance Slider
Kling AI includes a "Creativity and Relevance" slider, which controls how closely the AI follows your prompt:
Low Setting: The AI may take some creative liberties, which can result in more fluid but less precise animations.
Middle Setting: A balanced approach where the AI follows the prompt but retains some creative freedom.
Max Setting: Forces the AI to strictly adhere to your prompt, ideal for detailed or specific movements.
Adjust the slider according to your needs. If you want precise control over the animation, consider setting the slider to the maximum.
Step 6: Preview and Refine
After setting your prompt and adjusting the slider, click the "Generate Video" button. Kling AI will process your request and generate a preview of the animation:
Review the Preview: Watch the generated video to see if the animation meets your expectations.
Refine the Prompt: If necessary, go back and refine your prompt. You can also experiment with different slider settings or modes.
Re-Generate if Needed: If the result isn’t perfect, don’t worry-simply make adjustments and generate a new version.
Step 7: Save and Export Your Video
Once you’re satisfied with the animation, it’s time to save and export your video:
Click the "Save Project" button to keep your work in progress.
To export the final video, click on the "Export" button.
Choose your preferred video resolution and format.
Download the video file to your computer.
Tips for Better Results
Start with High-Quality Images: The better the quality of your original photo, the more impressive the final video will be.
Experiment with Different Prompts: Don’t be afraid to try out various prompts to see how Kling AI interprets them.
Use Simple Movements: For the best results, especially when starting out, focus on simple, natural movements.
Also read: Crafting Your Perfect Book Cover: A Step-by-Step Guide with Midjourney & Canva
Advanced tutorial to Kling AI image to video animation!
1. Understanding the basics: Image to video transformation
Kling AI excels at converting static images into animated videos by applying motion based on your prompts. The key to success lies in how you describe the actions you want to see in the video. Unlike basic prompts that only describe the scene, Kling AI requires you to specify the actions you want the characters to perform.
For instance, instead of saying, "a coorgi wearing sunglasses," you would use a prompt like, "A corgi wearing sunglasses strolling on the beach of a tropical island." This specific action-oriented prompt tells Kling AI exactly what movements to animate.
2. Prompting for movements
To achieve the desired animation, focus on the actions rather than just the static description of the scene. Here are some examples:
Basic Prompt: "A boy riding bicycle"
Action-Oriented Prompt: "A little boy rides his bicycle in a garden, experiencing scenes of changing seasons."
In the latter, Kling AI animates the boy riding his bicycle through dynamic seasons.
3. Leveraging Kling AI’s strengths: Hand and arm motions
Kling AI is particularly effective at animating hand and arm movements while maintaining the integrity of the character's body structure. For example, you can prompt actions like reading a book or drinking tea, and Kling AI will generate smooth animations of these motions. However, it's essential to be mindful of the complexity of the motion, as too much movement can cause slight blurring, particularly in facial features.
4. Standard mode vs. professional mode
Kling AI offers two modes for video generation: Standard Mode and Professional Mode.
Standard mode: Ideal for more complex movements, such as a character lying down on a couch. This mode is more flexible in handling extensive motion without significant distortion.
Professional mode: Provides higher visual quality but may struggle with intricate motions. For example, when trying to animate a character lying down, the movement might not render accurately, and background elements may distort, such as plants shaking unnaturally.
To achieve the best results, experiment with both modes depending on the complexity of the actions you want to animate.
5. Fine-tuning with the creativity and relevance slider
Kling AI features a slider that allows you to adjust the relevance and creativity of the prompts. By sliding this control to the maximum, you can force Kling AI to follow your prompts more precisely. This is particularly useful in Professional Mode, where strict adherence to prompts can sometimes be challenging.
For example:
Middle slider setting: The animation might be more relaxed, and the AI might not follow the prompt strictly.
Max slider setting: The AI will follow the prompt closely, even in Professional Mode, although it might introduce some blurring or color shifts in the process.
6. Controlling head and hand movements
Kling AI allows you to control subtle movements such as head turns and hand gestures. You can prompt your character to look in different directions or point their finger, and Kling AI will animate these actions accurately. However, be aware that some artifacts, like slightly deformed shadows, may appear during head movements.
7. Limitations: Camera movements
While Kling AI excels in animating character motions, it currently struggles with camera movements like zooming or panning. Despite various attempts, these camera motions do not consistently follow prompts, which is something to keep in mind when planning your animations.
8. Best practices for using Kling AI
Start with simple movements: Begin with basic hand or head movements before advancing to full-body motions.
Experiment with modes: Switch between Standard and Professional Modes to find the best fit for your animation needs.
Adjust the slider: Use the Creativity and Relevance Slider to fine-tune how strictly the AI follows your prompts.
Be patient with complex motions: If your character's face blurs or colors shift during complex motions, try simplifying the action or reducing the overall movement.
Kling AI is a powerful tool for animating static images into videos with controlled motions. While it has some limitations, especially with camera movements, its ability to handle complex human motions makes it a valuable asset for creative projects. By understanding how to prompt effectively and leveraging the various modes and sliders, you can create impressive animations that bring your characters to life.
Experiment with different actions, and enjoy the creative possibilities Kling AI offers!
Ready to bring your photos to life? Try Kling AI today and explore the endless creative possibilities. For more tips and advanced techniques, visit our website.